Facebook, either directly or through its subsidiaries like Instagram, is notorious for collecting personal data. This is why you want to clear your Facebook cache on iPhone often, especially when it comes to browsing data.
Additionally, there are explicit points in the Terms of Service which state that your information can be used to help advertisers and salespeople to bring some products ‘’closer to you’’.
There are three main reasons why you should clear your cache on Facebook at least once every few months:
- Less annoying ads
- Better cybersecurity
- Less chance for phishing fraud
And, because it is relatively easy to do for browsing cache alone, you can do it right away.
Three Types of Cache
Facebook has three types of cached data that it uses to operate. Some can be avoided by regular cleaning, some need additional software like a VPN, and others can’t be stopped if you plan on using the app.
Primarily, there is the browsing data that shows Facebook what are you interested in, which groups you frequent, and who you are cyberstalking from the shadows. That is something that you can clear in four easy steps.
Further, there is your user data. That is all the information you left that is connected with your profile, like your job positions, education, as well as any phone numbers. Generally, you can delete such information if you determine that they are more trouble than they are worth.
You can’t delete such information without deleting and clearing Facebook altogether.
And finally, there is the metadata that is collected between your iPhone and the Facebook app. Here is your IP address, device information, and similar technical specifications. The only way to clear such information is by deleting and reinstalling the app on your phone.
Different On the iOS 14… but the same
There are some changes introduced to all apps, as well as to the system with iOS 14. The update is overall beneficial to your phone’s performance and stability but removes from plain sight some options that were formerly present.
For instance, you won’t find how to delete your Facebook app from the settings menu anymore. You will need to do so from your main screen by holding on the app icon and waiting for the option ‘Delete App’ to appear.
Clearing Browser Data
To clear browsing data, you will need to follow four rather simple steps. And, once you find the options you will be able to follow them every time without any assistance.
Clearing browsing data won’t influence how you see FB, and you won’t be losing any of the data from your own profile. But, the recent searches that occur when you tap on ‘search’ won’t be there anymore.
So, if you are a benign cyber-stalker, you will need to remember how the names of the profiles you stalk are spelled.
#1 Open Facebook App![]()
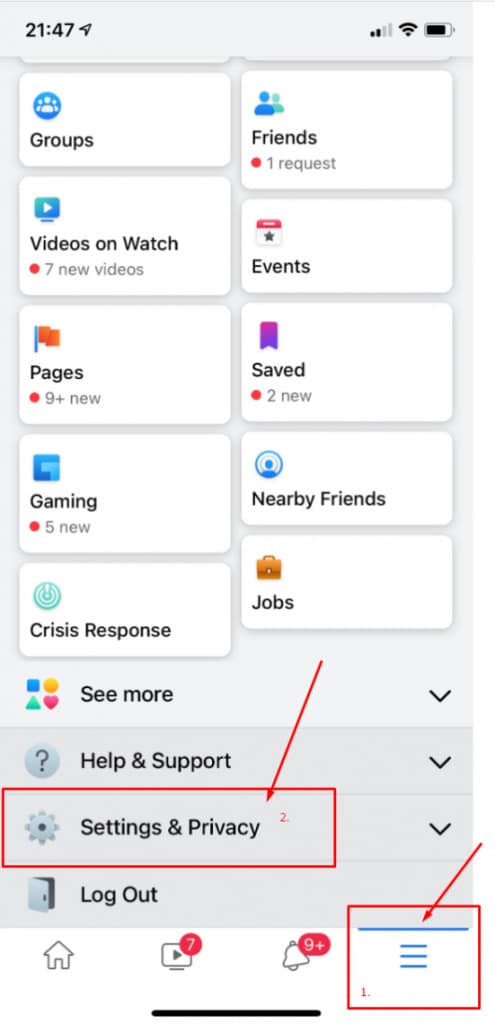
You don’t need to go to your system settings or anything. Simply open the app from your main screen and you will find additional account settings option in the bottom right.
Because the new app design is slightly childish and has a lot of big blocks and vibrant colors, you might need to force yourself to locate it. Still, it is always in the bottom right corner.
Also, for those who use iOS in ‘Dark Mode’, and I don’t know why anyone wouldn’t, the FB app doesn’t have such a feature – yet. There are some attempts to make it, but none seem to work just now. Prepare your eyes before entering the app.
#2 Enter Settings
The moment you tap, you will see a ‘settings and privacy’ option. That is exactly what you are looking for and it will lead you to see everything you can do with your account.
Once you tap, and a fall-down menu will open and show an option reading only ‘settings’ which you should click.
This will open a rather large selection of options, from ways to change your account settings, to different options for the FB market and advertisers.
But, the one thing you won’t find at first is ‘Browser Data’. And that is one of the differences from the last iteration of the app.
#3 Search for Browser Data
The best way to find what you need is to enter it into the search bar.
Simply start typing and you will see the needed ‘browser’ option that will tell you exactly what you have planned to do all along.

#4 Clear Data
Finally, you will find the option to clear all browsing data. It will be just under the explanation and the first spot you will see.
Depending on how much you browse and how much time has passed since you last cleared your data this action might take a few seconds, especially if you are working from older models.


